

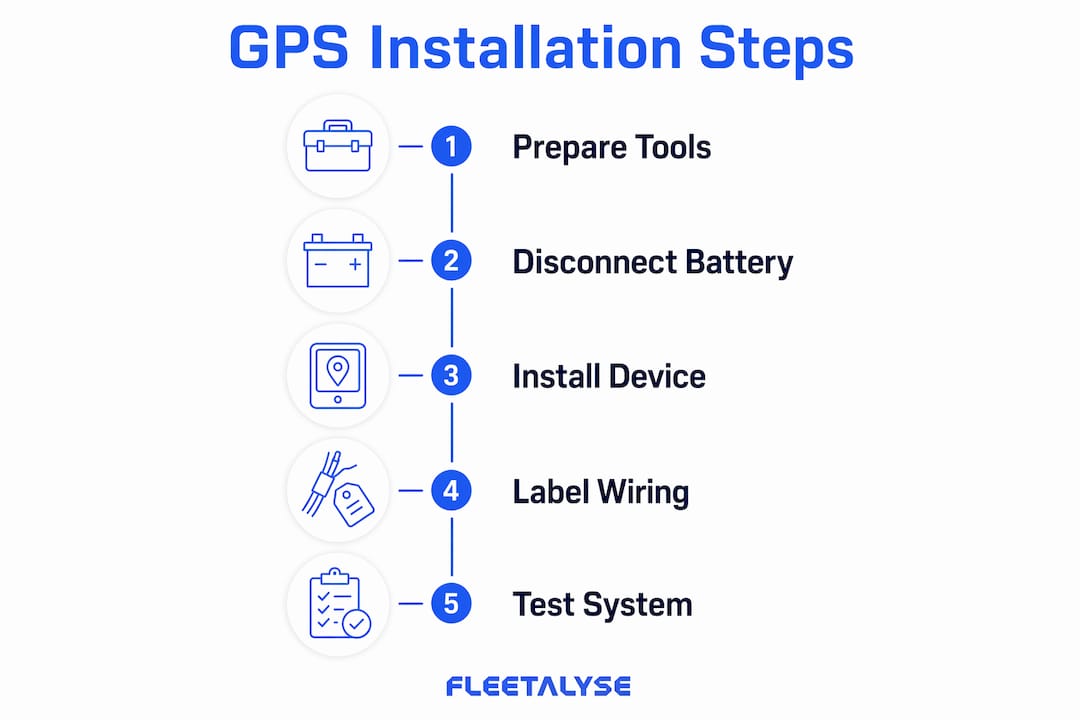
Van fleet GPS installation steps: a practical guide
Van fleet GPS installation is the process of fitting location tracking devices to commercial vans so fleet managers can monitor vehicle movements, verify driver hours, and meet DVSA compliance requirements. Getting the process right matters far more than most operators expect. A poorly installed device produces unreliable data, and unreliable data is worse than no data at all. The van fleet GPS installation steps covered here follow a clear sequence: prepare the vehicle, choose your installation method, wire or plug in the device correctly, and then configure the platform to turn raw location data into genuine operational intelligence. Fleetalyse supports this entire process with UK-based hardware and telematics expertise.
What tools and preparation do you need before GPS installation?
Thorough planning accounts for roughly 80% of the effort in a large fleet deployment. The physical installation is the smaller part. Getting preparation wrong is the most common reason fleet rollouts stall.
Before touching a single vehicle, gather the following tools:
- Multimeter for verifying wire functions before connecting anything
- Wire strippers and crimping tool for clean, secure connections
- Fuse taps or add-a-circuit connectors to draw power without cutting factory wiring
- Zip ties and adhesive cable clips for routing and securing cables
- Trim removal tools for accessing panels without causing damage
- Screwdrivers (flathead and Phillips) for panel removal
Safety preparation is non-negotiable. Disconnect the vehicle battery before any hardwired work. Never tap into CAN-bus circuits or airbag wiring. Tapping complex vehicle electrical systems risks triggering fault codes or disabling safety systems, which is why professional installation is strongly recommended for hardwired units in modern vans.
Plan your installation schedule to minimise downtime. For a logistics fleet, stagger installations across shifts or weekends. Identify your mounting location before the van arrives at the workshop. A GPS device mounted behind a metal panel will lose signal. Choose a location behind plastic trim, under the dashboard, or near the windscreen where the antenna has a clear view of the sky.
Pro Tip: Create a vehicle-specific wiring diagram for each van model in your fleet before you begin. Ford Transit, Mercedes Sprinter, and Volkswagen Crafter all have different fuse box layouts and wire colour conventions. Documenting this in advance saves significant time across a multi-vehicle rollout.
How do you install a plug-and-play OBD-II GPS tracker in a van?
The OBD-II method is the fastest GPS installation process available. OBD-II installation takes under one minute and requires no tools or electrical knowledge. That speed makes it popular for initial fleet trials and temporary deployments.
Follow these steps for a clean OBD-II setup:
- Locate the OBD-II port. In most commercial vans, it sits beneath the steering column, often behind a small plastic cover. Check your vehicle handbook if you cannot find it immediately.
- Plug in the tracker. Insert the device firmly until it clicks. A loose connection causes intermittent data loss.
- Power on the vehicle. The tracker draws power directly from the OBD-II port when the ignition is on. Most devices also retain a trickle charge when the ignition is off.
- Register the device on your platform. Log into your fleet management software, add the device serial number, and assign it to the correct vehicle profile.
- Configure initial settings. Set the vehicle’s registration, driver assignment rules, and any geofence boundaries relevant to your operation.
- Test connectivity. Drive the van for five minutes and confirm that live location data appears correctly in the platform dashboard.
The OBD-II method has clear limitations. The port is visible and accessible, making the device easy to unplug. For fleet managers concerned about tampering or driver removal, a hardwired installation is the more reliable long-term choice. OBD-II trackers also cannot access ignition-switched power independently, so some advanced telematics features may be restricted depending on the device.
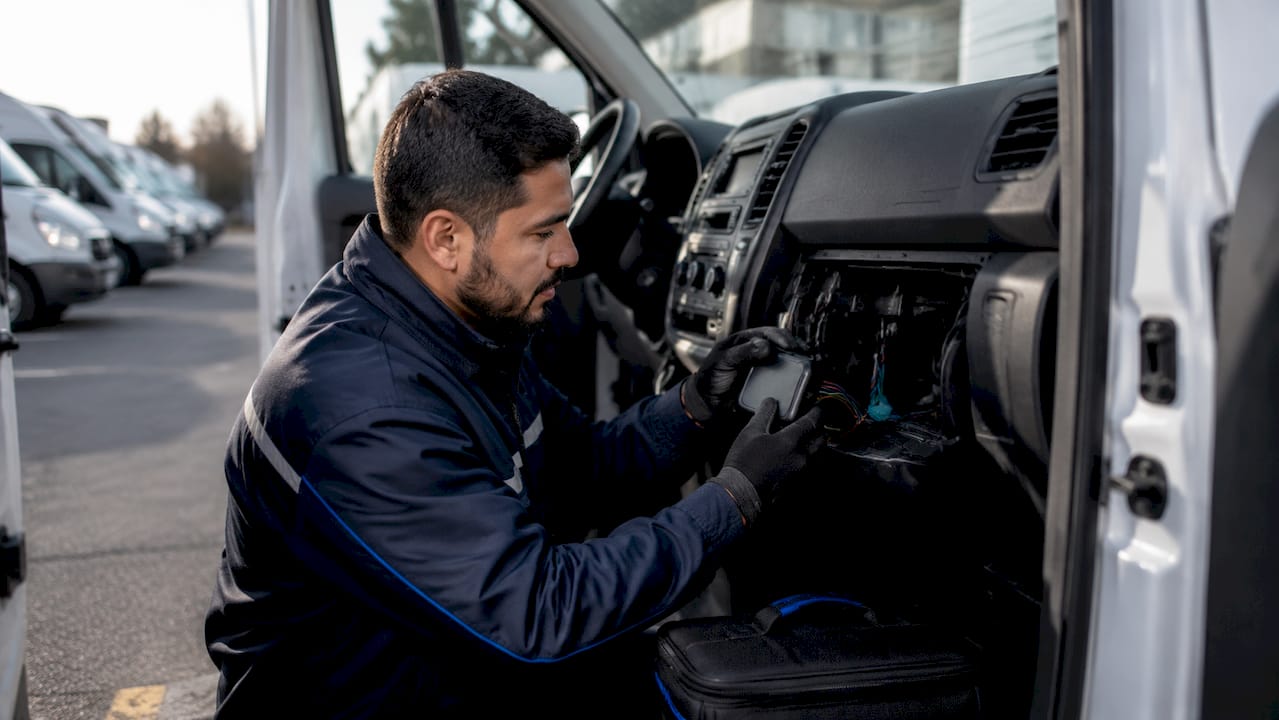
How do you hardwire a GPS tracker in a van fleet?
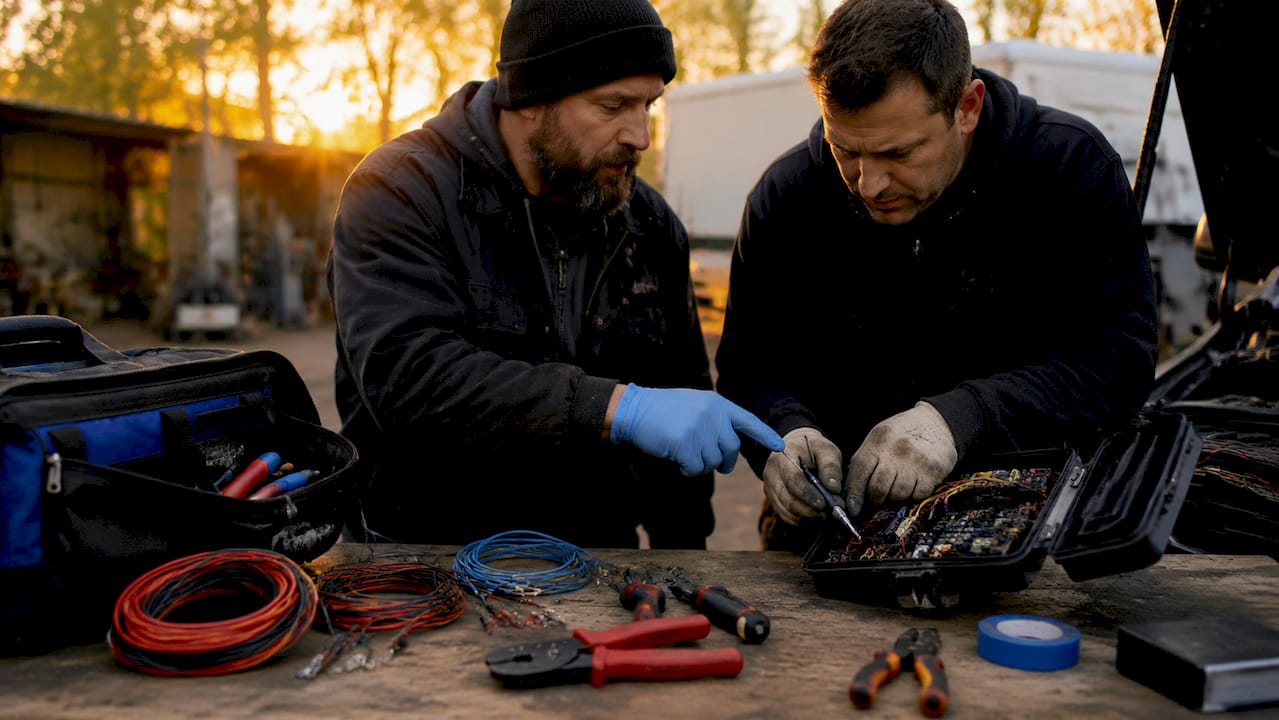
Hardwired GPS installation is the standard for permanent, tamper-resistant fleet tracking. Hardwired systems require 20–60 minutes of skilled labour per vehicle. The time investment pays off in data reliability and security.
Follow this sequence for a correct hardwired installation:
- Disconnect the battery. Remove the negative terminal before touching any wiring.
- Identify your three power wires. You need a constant 12V supply (live at all times), an ignition-switched 12V supply (live only when the ignition is on), and a chassis ground. Use your multimeter to confirm each wire’s function. Do not rely on wire colour alone.
- Connect using fuse taps. Insert fuse taps into the appropriate fuse slots in the vehicle’s fuse box. Essential tools for this stage include a multimeter, wire strippers, fuse taps, and zip ties. Avoid splicing directly into factory wiring where possible.
- Mount the GPS device. Position the unit behind non-metallic trim, such as the lower dashboard or A-pillar cover. The antenna must face upward or toward the windscreen for clear sky visibility.
- Route and secure all cables. Use zip ties and adhesive clips to keep wiring away from moving parts, heat sources, and sharp edges.
- Reconnect the battery. Reattach the negative terminal and check that no dashboard warning lights appear.
- Verify ignition detection. Turn the ignition on and off while monitoring the platform. Confirm the device correctly reports ignition status changes.
- Conduct a drive test. Take the van on a short route and verify that the platform records accurate speed, position, and trip start and end times.
Antenna placement is the detail most often overlooked on first installations. A GPS antenna placed behind a metal bulkhead or under a steel roof panel will produce signal drift that is far harder to diagnose than a complete device failure. Position the antenna where it has an unobstructed view through plastic or glass.
Pro Tip: Label each fuse tap with a small cable tag identifying the GPS device. This makes future diagnostics and removal far quicker, particularly when vehicles go in for servicing.
What are the most common GPS installation mistakes in van fleets?
Most GPS installation failures trace back to a small number of recurring errors. Identifying them before you start is far more efficient than diagnosing them after deployment.
- Swapping constant and ignition-switched power leads. The most prevalent wiring error is connecting these two wires in reverse. The result is incorrect ignition detection, missing trip data, and potential battery drain. Always verify with a multimeter before connecting.
- Poor antenna placement. Metal shielding causes signal drift that is harder to diagnose than a total device failure. Position the antenna with a clear view of the sky through plastic or glass.
- Skipping battery disconnection. Working on live circuits risks short circuits, blown fuses, and in rare cases, airbag deployment.
- Relying on wire colour coding. Wire colours vary between van manufacturers and even between production years of the same model. Always test with a multimeter.
- No post-installation verification. Plugging in a device and assuming it works is not a process. Confirm live data, ignition detection, and trip recording before signing off any vehicle.
Pro Tip: After installation, monitor the platform for the first 48 hours. Alerts for signal loss, unexpected ignition events, or missing trips usually surface within the first two days if a wiring error has been made.
When issues persist after checking wiring and antenna placement, seek professional assistance. Complex van electrical architectures, particularly in newer Euro 6 vehicles with advanced CAN-bus systems, can produce fault codes that require specialist diagnostic equipment to resolve.
How do you optimise installed GPS systems for fleet performance?
The value of a GPS system comes from integrated data, not the hardware alone. Configuring your platform correctly after installation is what converts location pings into operational intelligence.
Post-installation configuration should cover:
- Geofences. Define your depot, customer sites, and restricted zones. Geofence alerts tell you immediately when a vehicle enters or leaves a defined area, which is useful for both security and customer service.
- Driver behaviour reports. Configure thresholds for speeding, harsh braking, and rapid acceleration. These reports support both safety management and fuel cost reduction.
- Maintenance scheduling. Set mileage and time-based service alerts so vehicles do not miss scheduled maintenance. Unplanned breakdowns cost significantly more than preventive servicing.
- Tamper and unplug notifications. Enable alerts for device removal or signal loss. These are particularly relevant for OBD-II installations where removal is straightforward.
- Firmware updates. Schedule regular checks for device firmware updates. Outdated firmware can cause connectivity issues and missing platform features.
For fleet managers rolling out GPS across a large number of vans, a staged approach produces better results than a single mass deployment. Installing devices in one or two busy vans first allows you to validate ROI, identify vehicle-specific wiring issues, and build driver acceptance before committing the full fleet. This pilot approach also gives your logistics team time to learn the platform before they are responsible for monitoring dozens of vehicles simultaneously. For broader context on GPS deployment in logistics operations, the 2026 guide to GPS tracking for haulage fleets covers rollout planning in detail.
| Feature | Configuration action |
|---|---|
| Geofences | Define depot, customer, and restricted zone boundaries |
| Driver behaviour | Set thresholds for speed, braking, and acceleration events |
| Maintenance alerts | Configure mileage and time-based service reminders |
| Tamper notifications | Enable unplug and signal-loss alerts per device |
| Firmware updates | Schedule quarterly checks for all installed devices |
Key takeaways
Successful van fleet GPS installation depends equally on physical wiring accuracy and post-installation platform configuration, with planning accounting for the majority of the total project effort.
| Point | Details |
|---|---|
| Plan before you install | Thorough preparation, including vehicle-specific wiring diagrams, reduces errors and downtime. |
| Choose the right method | OBD-II suits trials and temporary use; hardwired installations are best for permanent, tamper-resistant tracking. |
| Verify every wire | Always use a multimeter to confirm constant 12V, ignition-switched 12V, and ground before connecting. |
| Position the antenna correctly | Place the antenna behind plastic or glass with a clear sky view to prevent signal drift. |
| Configure the platform fully | Geofences, driver behaviour reports, and maintenance alerts convert raw GPS data into fleet intelligence. |
What I have learned from van GPS installations done right and wrong
Fleet managers often underestimate how much of a GPS rollout is a planning project rather than a technical one. I have seen operators spend days troubleshooting signal issues that traced back to a five-minute decision made at the start: where to mount the antenna. Getting that single detail wrong on twenty vans means twenty separate diagnostic visits.
The other lesson I keep coming back to is the value of the pilot programme. Deploying to two vans first feels slow when you have a fleet of forty waiting. In practice, it saves weeks. You find the vehicle-specific wiring quirks, you get your platform configuration right, and your drivers have time to understand why the system is there. Resistance drops significantly when drivers see the data being used fairly rather than punitively.
Hardwired installations genuinely do require professional help in modern vans. The CAN-bus architecture in current Ford Transit and Mercedes Sprinter models is sophisticated enough that an incorrect tap can trigger fault codes that take a dealer visit to clear. The cost of professional installation per vehicle is modest compared to the cost of a day’s lost productivity from a van stuck in a workshop. For logistics fleet managers looking at broader deployment strategy, fleet management best practices for 2026 offers useful context on phased rollouts.
The final point I would make is this: installation is the beginning, not the end. A GPS device that is fitted but not configured is just a dot on a map. The fleet managers who get the most from their tracking investment are the ones who spend as much time setting up geofences, driver behaviour thresholds, and maintenance alerts as they do on the physical installation itself.
— Vytautas
Fleetalyse GPS tracking for van fleets
Fleet managers who want GPS tracking that goes beyond basic location data will find Fleetalyse built specifically for UK commercial operations.
Fleetalyse offers van GPS trackers designed for commercial vehicles, with both plug-and-play and hardwired options to suit different fleet requirements. The platform combines live vehicle tracking with driver behaviour monitoring, maintenance scheduling, and DVSA compliance tools in a single dashboard. UK-based support means you get installation guidance and troubleshooting from people who understand the vehicles and regulations you work with every day. Explore the full range of GPS tracking solutions to find the right fit for your van fleet.
FAQ
How long does van fleet GPS installation take?
OBD-II plug-and-play installation takes under one minute per vehicle. Hardwired installations require 20–60 minutes of skilled labour depending on the van model and wiring complexity.
Do I need a professional to install a hardwired GPS tracker?
Professional installation is strongly recommended for hardwired units in modern vans. Incorrect tapping of CAN-bus or airbag circuits can trigger fault codes and disable safety systems.
Where should I mount the GPS antenna in a van?
Position the antenna behind plastic or glass trim with a clear view of the sky. Placing it behind metal panels or under steel roof sections causes signal drift that is difficult to diagnose.
What is the most common wiring error in GPS installation?
Swapping the constant 12V and ignition-switched 12V leads is the most frequent mistake. It causes incorrect ignition detection and potential battery drain. Always verify wire functions with a multimeter before connecting.
How many vans should I start with when rolling out GPS tracking?
Start with one or two of your busiest vans. A small pilot allows you to validate ROI, resolve vehicle-specific wiring issues, and build driver acceptance before deploying across the full fleet.